It happens.
When you keep a sourdough starter, there will be times when, for circumstances sometimes beyond your control, your starter gets a bit off colour. Mostly, this occurs when you neglect it.
Most people I know take a whiff, ditch their sourdough starter and attempt to start again (no pun intended, but there are quite a few sourdough puns...), or just give it all up as too hard and head off to the supermarket for their sourdough bread...
Starting the Starter again loses the sourdough culture altogether, including the delicate micro environment established in it. Sometimes this micro environment has been established over a period of months, sometimes years. In my case, it's decades.
If you've maintained a starter for a long while, you probably already know how to care for it. So you won't need to read this.
But for those who would like to keep a starter for years or even dacades, follow the link below to my website, www.sourdoughbaker.com.
Read on if you'd like to know what to do when your starter is not well.
Until next time, Happy Sourdough Baking!
Saturday, June 6, 2009
Wednesday, May 20, 2009
Melbourne home of fine bakeries!
Hey all, I find myself in Melbourne once again. The thing that strikes me is the industry of the people this town exudes. Everywhere you go, there's some little passionate business opening up - whether it's food or furniture, there's something groovy or retro or just plain special almost anywhere you go.
This applies especially to bakeries - there seems to be one on just about every corner in every suburb, and they all have their particular niche. And, they're all fabulous!
I'll be posting a bit about Phillipas at Brighton in the next couple of days, so stay tuned. This is one that just always exceeds expectations, and I just think it's worth sharing with you a few of their secrets. I'm sure they won't mind....
Wednesday, May 13, 2009
SourdoughBaker.com.au Launches!
Hey all!
Firstly, my apologies for not attending to this blog for a few weeks. I do have a good excuse, though - I've been busy writing for my new website, www.sourdoughbaker.com.au, which covers everything you may have read in this blog, plus loads more. There is also a substantial amount of detail there which may help you get things working better!
So, here's a bit of direction for you (just click on the titles and they will take you straight to the page in a new window):
Happy Baking!
Firstly, my apologies for not attending to this blog for a few weeks. I do have a good excuse, though - I've been busy writing for my new website, www.sourdoughbaker.com.au, which covers everything you may have read in this blog, plus loads more. There is also a substantial amount of detail there which may help you get things working better!
So, here's a bit of direction for you (just click on the titles and they will take you straight to the page in a new window):
- Rye Flour Explained
- Spelt Flour explained
- Wheat Flour explained
- Old Dough Recipes
- Daily Spelt Bread Recipe
- Salt in Breadmaking
- Bakery in a Box
Happy Baking!
Tuesday, March 31, 2009
Spelt Flours
Spelt Flours Explained
There are four common grades of spelt flour, which can be found at your local health food store:
Secondly, the bread you make from each of the different grades of flour will be quite different. This applies to the look, feel and taste of the breads, as well as to the amount of water that you need to use in the dough. Wholemeal flours contain more bran, which absorb more water. Thus, recipes will vary considerably, according to what grade of spelt flour is used. If I have said that the recipe requires a certain amount of water, and your spelt flour is more bran than mine, you'll need to adjust the water content in the recipe.
My rule of thumb is to practice until you become familiar with the type and consistency of dough you are comfortable with. A true baker works mainly from proportions, rather than measurements. You become increasingly aware of what feels 'right', and so you'll add or subtract accordingly.
My next post will go into a spelt sourdough bread recipe in detail, based on the grade of flour available here in my locality. You may find you can only get certain grades where you are. This is quite likely when it comes to something like spelt flour, here in Australia, where there are only small producers. That's why I have gone into the different grades of spelt flour here first. You will be able to adjust your recipes to suit availability - but bear in mind that over time I will cover recipes for different grades of flour anyway.
Until then, Happy Baking!
There are four common grades of spelt flour, which can be found at your local health food store:
- Wholemeal - this means that only the husk has been removed, so there is a lot of bran left in the flour. This is suitable for wholemeal breads, which will be heavier and tastier than their white counterparts.
- 80/20 - which is essentially wholemeal less about 20% of the bran. So it's a bit lighter, and very workable in terms of the home baker. This flour will yield quite light dough, with lots of flavour, but with all the heavy duty bran removed. You would still call this flour a wholemeal flour though.
- Light Unbleached - now we're getting towards white spelt flour. Essentially, this flour is 20/80, or 80% of the bran removed. A very nice general purpose breadmaking flour, still with a good amount of flavour, but with the ability to be used for producing fairly light breads and even pastries.
- White - all the bran removed, this is still a very flavoursome spelt flour. Suitable for fairly light breads, though is not in the same league as white wheat flour in terms of lightness.
Secondly, the bread you make from each of the different grades of flour will be quite different. This applies to the look, feel and taste of the breads, as well as to the amount of water that you need to use in the dough. Wholemeal flours contain more bran, which absorb more water. Thus, recipes will vary considerably, according to what grade of spelt flour is used. If I have said that the recipe requires a certain amount of water, and your spelt flour is more bran than mine, you'll need to adjust the water content in the recipe.
My rule of thumb is to practice until you become familiar with the type and consistency of dough you are comfortable with. A true baker works mainly from proportions, rather than measurements. You become increasingly aware of what feels 'right', and so you'll add or subtract accordingly.
My next post will go into a spelt sourdough bread recipe in detail, based on the grade of flour available here in my locality. You may find you can only get certain grades where you are. This is quite likely when it comes to something like spelt flour, here in Australia, where there are only small producers. That's why I have gone into the different grades of spelt flour here first. You will be able to adjust your recipes to suit availability - but bear in mind that over time I will cover recipes for different grades of flour anyway.
Until then, Happy Baking!
Monday, March 30, 2009
Making a Sourdough Starter from Spelt

As a Starter, Spelt Rocks!
In this blog, I've gone into quite a bit of detail about how to get a starter established (go back to 'sourdough starter' - there are a bunch of posts on the subject, and you'll need to scan them all to make sense of this one).
If you would like more general information about sourdough starters, you'll find it on my website, SourdoughBaker.com.au. There you will also find more recipes and lots of good info about sourdough breadmaking, as well as courses I run regularly.
Lately I've been experimenting with spelt flour in starter, and it's actually a very viable grain to use. Quite often I'll use different grains in starters and methods of handling them - mainly because I'm endlessly curious, but also because there are different strokes for different folks...
Meaning that if you're looking for a particular 'zone' in your breadmaking, it pays to try different approaches in getting there. For example, right now I'm going for a soft, sweet, wholemeal but light kind of zone. I've also been trying to work out a relatively wheat free diet for myself and my family.
I'm not sold on the idea that wheat is the devil at all, but having said that, for some people, wheat is better avoided. For others, wheat is just too dominant in their diet - it turns out that they are basing all three meals around it. Thus, if this can be reduced, it's got to be a good thing to use spelt. So here we are.
Spelt flour ferments well - it has a lot of natural enzymes and yeasts in there, and it holds for a while without turning acid. This is good for our purposes.
If you have a starter established already using regular wheat flour, it can be fed with Spelt quite successfully. Because of the way spelt is milled, you will find that it absorbs quite a bit of water, so you may have to up the water ratio slightly - see 'sourdough starter method' in this blog. Generally, I use one part water to one part flour as a default ratio in all my liquid starters, but the more wholemeal the flour, the more water in the ratio.
You could try one part flour to about 1.2 parts water to get a quicker result. If you have been using my method, and you have managed to get a starter established, then just start feeding it with spelt, and maybe adding a bit of extra water.
Bear in mind, though, that different grades of spelt flour exist. Essentially, millers remove more or less of the bran, to create different grades of flour. Spelt has more bran than wheat, and this is one of the reasons why it costs more, too. Millers simply lose more of the value of the grain in bran, and so they have to make this value back on the flour. So the whiter the flour, the more you'll pay. You can get about four grades of spelt flour - 'white spelt' (virtually no bran), 'unbleached spelt' (about 95% of the bran removed), 80/20 spelt (which has about 80% of the bran removed ) and wholemeal spelt, which has no bran removed, just a bit of husk.
Because of the fact that only small to medium scale millers are all that are geared up to handle spelt in Australia, the price for spelt flour is still quite high. There are other reasons for the high price, which I'll post more on later. Having said that, if you're making bread at home, it's till possible to make a loaf for less than the cost of regular bread at the supermarket. It's important to keep these things in pespective!
But for using in starter, there is good news. Wholemeal spelt, which is by far the cheapest grade, is probably the best for use as starter. It will get things really active, really fast. As I mentioned earlier, for wholemeal, use a bit more water. I won't repeat the method here, just look in this blog for details. It's exactly the same method, even from scratch.
Tomorrow I'll post a bit more about using Spelt in actual recipes. There are a few tricks, and you'll be making great bread in no time if you use them. But more on that tomorrow!
Meanwhile, have a a look at my full website at www.sourdoughbaker.com.au.
Happy baking!
Saturday, March 28, 2009
Lets Talk about Spelt!
What is Spelt, and why would I want to use it?
I'm assuming that you've heard a bit about spelt already - and you probably already know that it's been cultivated since Roman times and possibly a whole lot earlier - a kind of prototype of modern wheat if you like. If you've done more than a smidgin of research, you'll also know that it's quite possible that spelt is actually a hybrid of wild goat grass and emmer wheat. So it has direct links to native species of grass - it's actually been around since before we figured out how to cultivate things. This makes it old, old, old. Deserves respect, the time of day and all that.
So I thought I would give it the respect it so rightfully deserves, and play with it a little now and again - try to figure out how it fits in to our modern day mashup. I have to tell you that my heart really belongs to wheat, but I'm being won over by spelt. It's got a whole lot going for it on a number of levels. Apart from a mysterious and illustrious history, it's also a very good grain to make bread with. It has a sensational flavour, rises well, keeps well, and is suitable for people who have wheat intolerances. This will make a whole lot of people who have had to eat naturopathic limbo foods very happy indeed, because this spelt stuff really does the trick for diehard wheateaters like my good self. It has a type of protein which is more easily digested than wheat, and yet doesn't hide it's deliciousness at all. Bring it on, I say.
I wanted to get this post out there quickly, because there is a lot to be said about this particular grain. So I'm chunking it down - in coming days, I'll talk about making Sourdough Starter using Spelt, and how to use it in bread recipes. I also want to go into a few different millings commonly available, and what they are best for. I also would like to speak a bit about the downside of the global economy - I'm not joking, this really is a case of we pay more for what happens on the global market.
I've got more about grains on my website at www.sourdoughbaker.com.au.
Until then, happy baking!
Wednesday, March 18, 2009
Sourdough Bread Recipe
At Last! A Recipe!
At this point, we're ready to go do some baking. So far we've:
This recipe can make two one kilo sourdough loaves. If you only have one bread tin, simply divide the measurements in two.
You'll need:
Intermediate Proofing:
When it's ready, take it out of the box and divide it in two. This is where the stainless steel dough scraper comes in handy (see this blog post on 'Baking Essentials'). You can get this roughly correct by eye, and just use your scales to adjust, cutting small peices of dough from the bigger ball and putting them on the smaller one. Take each piece and round it by hand with the seam at the bottom. Place at either end of the plastic box so they don't merge in the 'intermediate prooving' stage(this is the baker's term for what you're currently setting up). Put the lid back on and leave the rounded balls of dough to recover. In warm weather, this will only take about half an hour. If it's cooler, this could take a couple of hours. Of course, if you don't have time to wait, you can just pop the rounded balls in the fridge and come back to them later. Don't worry, if your starter is ripe and you've done everything correctly, these dough balls will survive in the fridge for a day or so.
They're ready when they've expanded and are soft to the touch. If you poke them with your finger and the dough doesn't bounce back immediately, they're ready. If there is a fair bit of resistance, and they don't feel soft, leave them until they do.
Now take them out of the box and place them on the bench, still with the seam at the bottom. Take one, turn it over, and flatten it out a bit, till it's about an inch thick. Now roll it into a cyclider, remembering to keep the seam heading into the middle of the dough. This will create a nice smooth outer surface. Once you have a cylinder, do the next one in the same way. Always return them to the bench with the seam you've created on the bottom, so you can't see it.
Spray or wipe some water on the moulded cylinders, take your sieve and scoop some flour into it, and dust lightly over the top. Now put a few parallel diagonal slashes into the dough - quite deep. Pick up from underneath and place in your oiled tins.
If your tins are the right size, the dough should occupy about three quarters of the space. This will allow them to eventually rise above the top of the tins, making a very pleasing looking loaf.
Final Proofing:
Put the tins back in your dough box and return the lid. If you have one like the one in this blog, you can turn it upside down, put your tins on the lid, and place the base of the box over the top. Once inside this container, you've prevented the formed and tinned dough from skinning, and you've also created a mini prover, which will help the dough to prove quickly.
Once they have risen to fully fill the tin, turn on your oven. But before you do, read the next section!
Baking your Bread
A word about ovens, before I go into baking details!
Your oven will either be gas, electric, or possibly even wood fired (the latter if you are baking obsessed, or if you live in a cold climate and have a fuel stove).
It pays to set up your oven for baking bread before you begin. Very few domestic ovens can give you the type of result a commercial baker's oven can. What follows is a quick rundown on getting the best out of your domestic beast - and believe me, neglecting this section can make all your hard work so far a complete waste of time if the oven is set up incorrectly. You will try time and time again to get a great loaf, and time and time again you will fail, wondering what went wrong. When you set up your oven, your bread will at least have a fighting chance of turning out just like a bought one!
If you have a gas oven, the heat tends to be sharper; they lose and regain heat quite quickly. Bread needs a steady heat for the best crust and rise. The antidote? If there is space at the bottom of the oven, I recommend placing a couple of paving bricks just off the floor. Obviously, you don't want to put them in the way of the flame, but if you can, put them on a baking rack so that air can circulate all the way around the bricks. This is particularly important if you have a fan forced (or convection) gas oven. These paving bricks will stabilise the heat somewhat. You'll need to 'set' the oven for a bit longer before baking, to get the bricks warm, but the results you get will be worth the small amount of extra gas used.
If you have an electric oven, it takes longer to get hot, but it is a steadier and drier heat. A brick at the base won't hurt, but it's more important is to make sure there is adequate moisture in there. When you are about to begin baking, place a small bowl of water at the base of the oven. This will begin to evaporate once the oven gains enough heat, and will really help to set a good crust on your bread.
Convection Ovens (gas or electric):
As a rule of thumb, convection (or fan forced) ovens run about 10 to 20 degrees celsius hotter than ones without a fan. The advantage here is that they have a more even temperature. The disadvantage is that they tend to dry the bread out. Again, a bowl of water in the bottom of the oven will work wonders. Remember to put it in when you first fire up the oven, or the water won't be evaporating until you pull the bread out, which is too late.
Ovens without a fan (gas, electric or fuel stove):
These ovens are prone to accumulating heat at the top, and near the element. Sometimes the element is on the floor, other times at the back. I've even seen them with the element on one side only! What were they thinking? Anyway, there are advantages to these kinds of ovens. One is that they tend to set a very good crust - quite thick and chewy. Sometimes you'll have to turn the bread around halfway through the bake, but generally you'll find the heat is steady and not too dry.
These ovens will benefit from the paving brick on the bottom - this will draw in the heat and disperse it more evenly. They also do well with a bowl of water. Finally, allow a good long time to 'set' the oven when first bringing it up to temperature - this will tend to iron out most of the unevenness in the oven itself.
Now, the most important thing most home bakers seem to forget is to set up the racks in the oven beforehand, so that when you place the bread tin inside, it is surrounded by roughly the same amount of space all the way around it. I know that's a long way of saying 'in the middle', but if you think about it, it's more accurate the way I've described it. I've seen people put the base of the bread in the middle, so the top is too high, and visa versa.
This is your starting point, and is generally the best placement, though there are exceptions. I'll return to these at a later date.
If you're keen to get started, I'll tell you that 180 degrees celsius is my default temperature for bread. Wind this down by 20 degress in a fan forced oven. Time varies depending on the volume of dough to be baked - longer for a bigger load. But again, I default to about an hour, checking after about 40 minutes to rotate or correct accordingly.
So that's enough for now. I'll return to discuss the finer points of oven work in a future post.
I have more recipes at www.sourdoughbaker.com.au.
Until then, happy baking!
At this point, we're ready to go do some baking. So far we've:
- Started our first sourdough starter (see post labelled '7 day sourdough starter recipe')
- Assembled our baking toolkit (see post labelled 'baking essentials')
This recipe can make two one kilo sourdough loaves. If you only have one bread tin, simply divide the measurements in two.
You'll need:
- About 400 g ripe sourdough starter (to ascertain ripeness, see the post on '7 day sourdough starter recipe'). This by volume equates to about 2 cups full, though I usually don't use volume as a measurement, because starter varies a great deal in volume. There are times when it's very gaseous, and other times when it's more of a batter, depending on ripeness. Best to weigh it. If you have scales that tare, putting your water jug on the scales, tare it, and put the weight of starter into them using a large spoon or cup.
- About 1.2 kg white flour (I'm a fan of organic unbleached flour, but if you prefer regular white flour, go for it!). As a rule of thumb, the more wholemeal the flour, the more water it will hold, so allow for this when adding the water.
- Be ready with about 600 ml of filtered water (the temperature of the water needs to be luke warm in winter, but for the rest of the year room temperature will do - more on this in future posts).
- 24 g of coarse salt (cooking salt is fine. Salt flakes are even better for texture, but don't get these mixed up with rock salt. Rock salt just doesn't dissolve, and you'll end up with chunks of salt in the bread).
Delayed Salt Dough Method:
This method is known to bread geeks and bakers alike as the 'delayed salt' method. It saves a lot of elbow grease, and allows you to recreate that sensational uneven sourdough texture you'll find in all the great sourdough breads.
In your plastic box or mixing bowl (see my previous post on 'breadmaking equipment'), pour in the flour. Make a well in the middle, and pour in some (start with about half) of the the water. Use your plastic scraper, and put the starter in too.
Using one hand only, mix the ingredients together roughly. I go for a circular motion, using my whole hand. This causes the flour to fall into line quite naturally. You don't need to knead - what you're after at this stage is just a fairly loose dough. Lumps are OK - this method actually allows chemistry to do the work f or you. If you can manage keeping one hand clean, you'll find that cleaning up afterwards is much easier. You may need to add some more water as you go, if the dough feels too thick or tight.
(Remember to just use one hand if you can - when you do stuff like turn on and off taps, open cupboards etc with doughy hands, you'll soon discover just how quickly dough gets onto everything! The distribution of small fragments of dough through your kitchen makes being a domestic baker quite a chore, so I do what I can to keep it tidy as I go).
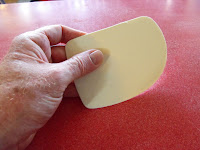
Make sure that the dough has absorbed all the flour and all the water before you leave it to rest. Once this has been achieved, put the lid on and leave it for about an hour. The picture at the left gives you a bit of an idea about how loose this dough can be.
After about an hour, spinkle the salt over the dough. Knead it through, still using one hand until the dough comes together. You'll be amazed at how smooth the dough quickly becomes - in no time at all you should get a ball like in the second picture. This is because of putting in the salt later - the yeasts and enzymes are already working on the gluten structure, creating nice even sheets separated by water - all the better to play with and make shapes!

Don't worry about trying to get it perfect - as long as the salt is not all over the outside of the dough, it'll be fine. Once it starts to come together, you can use both hands. Now you'll find the dough is easy to remove from your hands too, because gluten has begun to form.
First Proofing:
Leave the dough to rest in the box with the lid on overnight, or for about 6 to 8 hours. You'll find that the dough will have doubled in size or more, and will be quite soft. If it hasn't, leave it for the rest of the day. If it's hot weather, put it in the fridge after a couple of hours. It'll be fine. Sourdough isn't like yeasted bread - the natural yeasts are capable of handling cool temperatures as well as warm.
This method is known to bread geeks and bakers alike as the 'delayed salt' method. It saves a lot of elbow grease, and allows you to recreate that sensational uneven sourdough texture you'll find in all the great sourdough breads.
In your plastic box or mixing bowl (see my previous post on 'breadmaking equipment'), pour in the flour. Make a well in the middle, and pour in some (start with about half) of the the water. Use your plastic scraper, and put the starter in too.
Using one hand only, mix the ingredients together roughly. I go for a circular motion, using my whole hand. This causes the flour to fall into line quite naturally. You don't need to knead - what you're after at this stage is just a fairly loose dough. Lumps are OK - this method actually allows chemistry to do the work f
 or you. If you can manage keeping one hand clean, you'll find that cleaning up afterwards is much easier. You may need to add some more water as you go, if the dough feels too thick or tight.
(Remember to just use one hand if you can - when you do stuff like turn on and off taps, open cupboards etc with doughy hands, you'll soon discover just how quickly dough gets onto everything! The distribution of small fragments of dough through your kitchen makes being a domestic baker quite a chore, so I do what I can to keep it tidy as I go).
Make sure that the dough has absorbed all the flour and all the water before you leave it to rest. Once this has been achieved, put the lid on and leave it for about an hour. The picture at the left gives you a bit of an idea about how loose this dough can be.
After about an hour, spinkle the salt over the dough. Knead it through, still using one hand until the dough comes together. You'll be amazed at how smooth the dough quickly becomes - in no time at all you should get a ball like in the second picture. This is because of putting in the salt later - the yeasts and enzymes are already working on the gluten structure, creating nice even sheets separated by water - all the better to play with and make shapes!

Don't worry about trying to get it perfect - as long as the salt is not all over the outside of the dough, it'll be fine. Once it starts to come together, you can use both hands. Now you'll find the dough is easy to remove from your hands too, because gluten has begun to form.
First Proofing:
Leave the dough to rest in the box with the lid on overnight, or for about 6 to 8 hours.
 You'll find that the dough will have doubled in size or more, and will be quite soft. If it hasn't, leave it for the rest of the day. If it's hot weather, put it in the fridge after a couple of hours. It'll be fine. Sourdough isn't like yeasted bread - the natural yeasts are capable of handling cool temperatures as well as warm.
Intermediate Proofing:
When it's ready, take it out of the box and divide it in two. This is where the stainless steel dough scraper comes in handy (see this blog post on 'Baking Essentials'). You can get this roughly correct by eye, and just use your scales to adjust, cutting small peices of dough from the bigger ball and putting them on the smaller one. Take each piece and round it by hand with the seam at the bottom. Place at either end of the plastic box so they don't merge in the 'intermediate prooving' stage(this is the baker's term for what you're currently setting up). Put the lid back on and leave the rounded balls of dough to recover. In warm weather, this will only take about half an hour. If it's cooler, this could take a couple of hours. Of course, if you don't have time to wait, you can just pop the rounded balls in the fridge and come back to them later. Don't worry, if your starter is ripe and you've done everything correctly, these dough balls will survive in the fridge for a day or so.
They're ready when they've expanded and are soft to the touch. If you poke them with your finger and the dough doesn't bounce back immediately, they're ready. If there is a fair bit of resistance, and they don't feel soft, leave them until they do.
Now take them out of the box and place them on the bench, still with the seam at the bottom. Take one, turn it over, and flatten it out a bit, till it's about an inch thick. Now roll it into a cyclider, remembering to keep the seam heading into the middle of the dough. This will create a nice smooth outer surface. Once you have a cylinder, do the next one in the same way. Always return them to the bench with the seam you've created on the bottom, so you can't see it.
Spray or wipe some water on the moulded cylinders, take your sieve and scoop some flour into it, and dust lightly over the top. Now put a few parallel diagonal slashes into the dough - quite deep. Pick up from underneath and place in your oiled tins.
If your tins are the right size, the dough should occupy about three quarters of the space. This will allow them to eventually rise above the top of the tins, making a very pleasing looking loaf.
Final Proofing:
Put the tins back in your dough box and return the lid. If you have one like the one in this blog, you can turn it upside down, put your tins on the lid, and place the base of the box over the top. Once inside this container, you've prevented the formed and tinned dough from skinning, and you've also created a mini prover, which will help the dough to prove quickly.
Once they have risen to fully fill the tin, turn on your oven. But before you do, read the next section!
Baking your Bread
A word about ovens, before I go into baking details!
Your oven will either be gas, electric, or possibly even wood fired (the latter if you are baking obsessed, or if you live in a cold climate and have a fuel stove).
It pays to set up your oven for baking bread before you begin. Very few domestic ovens can give you the type of result a commercial baker's oven can. What follows is a quick rundown on getting the best out of your domestic beast - and believe me, neglecting this section can make all your hard work so far a complete waste of time if the oven is set up incorrectly. You will try time and time again to get a great loaf, and time and time again you will fail, wondering what went wrong. When you set up your oven, your bread will at least have a fighting chance of turning out just like a bought one!
If you have a gas oven, the heat tends to be sharper; they lose and regain heat quite quickly. Bread needs a steady heat for the best crust and rise. The antidote? If there is space at the bottom of the oven, I recommend placing a couple of paving bricks just off the floor. Obviously, you don't want to put them in the way of the flame, but if you can, put them on a baking rack so that air can circulate all the way around the bricks. This is particularly important if you have a fan forced (or convection) gas oven. These paving bricks will stabilise the heat somewhat. You'll need to 'set' the oven for a bit longer before baking, to get the bricks warm, but the results you get will be worth the small amount of extra gas used.
If you have an electric oven, it takes longer to get hot, but it is a steadier and drier heat. A brick at the base won't hurt, but it's more important is to make sure there is adequate moisture in there. When you are about to begin baking, place a small bowl of water at the base of the oven. This will begin to evaporate once the oven gains enough heat, and will really help to set a good crust on your bread.
Convection Ovens (gas or electric):
As a rule of thumb, convection (or fan forced) ovens run about 10 to 20 degrees celsius hotter than ones without a fan. The advantage here is that they have a more even temperature. The disadvantage is that they tend to dry the bread out. Again, a bowl of water in the bottom of the oven will work wonders. Remember to put it in when you first fire up the oven, or the water won't be evaporating until you pull the bread out, which is too late.
Ovens without a fan (gas, electric or fuel stove):
These ovens are prone to accumulating heat at the top, and near the element. Sometimes the element is on the floor, other times at the back. I've even seen them with the element on one side only! What were they thinking? Anyway, there are advantages to these kinds of ovens. One is that they tend to set a very good crust - quite thick and chewy. Sometimes you'll have to turn the bread around halfway through the bake, but generally you'll find the heat is steady and not too dry.
These ovens will benefit from the paving brick on the bottom - this will draw in the heat and disperse it more evenly. They also do well with a bowl of water. Finally, allow a good long time to 'set' the oven when first bringing it up to temperature - this will tend to iron out most of the unevenness in the oven itself.
Now, the most important thing most home bakers seem to forget is to set up the racks in the oven beforehand, so that when you place the bread tin inside, it is surrounded by roughly the same amount of space all the way around it. I know that's a long way of saying 'in the middle', but if you think about it, it's more accurate the way I've described it. I've seen people put the base of the bread in the middle, so the top is too high, and visa versa.
This is your starting point, and is generally the best placement, though there are exceptions. I'll return to these at a later date.
If you're keen to get started, I'll tell you that 180 degrees celsius is my default temperature for bread. Wind this down by 20 degress in a fan forced oven. Time varies depending on the volume of dough to be baked - longer for a bigger load. But again, I default to about an hour, checking after about 40 minutes to rotate or correct accordingly.
So that's enough for now. I'll return to discuss the finer points of oven work in a future post.
I have more recipes at www.sourdoughbaker.com.au.
Until then, happy baking!
Saturday, February 28, 2009
Basic Stuff You Need to Make Sourdough Bread
 Now that we've got our Sourdough Starter active and ready to make bread, I thought I'd provide a simple and tasty recipe for you to get your head around my favourite method of breadmaking.
It's my favourite because it involves no machinery, no fancy additives, and not much effort or time. Zen simple, really.
But first, you will need a few basic pieces of equipment - and I promise this stuff will not cost much at all, nor be hard to find. So you can put that credit card away!
Everything you need for most of my sourdough bread recipes:
- A plastic box or
 bowl large enough to knead dough in, but small enough to fit in your fridge. It should have a close fitting lid, but not an airtight lid. My favourite kind is rectangular, about 45 cm long by 30 cm wide, and 20 cm high. This container serves a number of purposes; it's for kneading in (though this recipe doesn't require much kneading at all), for resting and refrigerating the dough, and for proving the dough in the tin when it's ready. You should be able to hold about 5 kilos of dough in your container - though you will rarely make that much dough! But you can, and later, when I show you some really light breads, the extra size will come in handy.

- Two or Three bread tins - mine are smallish at about 30cm by 10cm by 15cm. They need to be able to handle about 800g to 1kg of dough. Bear in mind that sourdough grows by only about 1.5 times in volume - a bigger tin can make the finished product look small!
 A plastic 'blade' for scraping dough down the sides of things, and a stainless steel spatula for cutting the dough. If you can get your hands on a dough divider from a kitchen shop, great. These are very handy because you can put a fair bit of weight on them. Likewise, the plastic blade can be substituted for a plastic plasterer's blade from a hardware store, or cut from a thick piece of plastic if you're really stuck.
 These also double as bench scrapers, because you will find, if you are new to home breadmaking, that dough is very hard to clean off things. Scraping is better than wiping every time!


- A flat laminated surface for dough to be divided and formed on. Because you're dealing with flour, make sure it's free of 'bench furniture' like bowls, crockery and 'stuff' - these all become extra things to clean later. A metre or so of space, say 600mm deep by about a metre or more wide, will suffice.
- A sink nearby, clear of 'stuff' also! If you have dishes in the sink, you will find that dough gets into everything (as a default position, if you clear the kitchen of stuff in general before each doughmaking session, you'll find that things are simpler later on in terms of cleaning).
- Oven gloves or silicon mitts (I've recently disovered silicon mitts, which are great because they don't get smelly and can be washed up with your utensils. They also handle hot tins far better than oven gloves).
- A basic set of kitchen scales. If you can get digital, make sure it can manage 2 gram increments, up to 2kg. I've got cheap, robust ones for dough, and accurate digital ones for things like salt, where you need to be precise. Note:You will find that you can get away with
 measuring spoons for the finer measurements. They are cheap and can be purchased in any supermarket.

- A large plastic or stainless steel sieve for 'dusting'. Make sure the mesh is quite fine, to prevent lots of flour falling through.
- A 1 litre measuring jug - preferably see through. I like plastic because they tend not to break like glass can (and does). Some people like stainless jugs - my guess is these people may well be aesthetes, and these jugs are durable. You just can't see what's in them from the outside!
- A nylon flo
 or scrubbing brush to scrub dough from your hands. There are gentler ways, like using disposable foodservice gloves, or wet tea towels - but if you get the right kind of scrubber, it will be your best bakery friend! These are also very handy when it comes to scrubbing tubs and bowls which have accumulated dough and flour residue on them. The one pictured here has very soft bristles, and does not hurt your hands when used.

- A serrated bread knife and a bread board for slicing your freshly baked bread!
Some Optional Extras
- A probe thermometer which has a narrow temperature range - say from zero centigrade to 50 degrees. This is handy for diagnosing what might be going wrong with your dough, or for achieving better consistency from batch to batch. I'll talk more about this later.
- A flat baking sheet - either stainless steel, aluminium or silicone - for batards and viennas, platts, cobs and other shapes. Please bear in mind that 'free form' breads require a bit more skill, both in doughmaking and dough handling. However, once you get the basics right, you'll want to turn out really professional looking breads, and a sheet is definitely an asset at this point.
- A water sprayer for moistening your finished formed dough prior to dusting with flour. I still just wipe mine with wet hands - but each to their own, I guess!
- A paring knife for slashing your dough prior to baking. Any sharp knife will do, though.
- A large, round bowl, either stainless steel, porcelaine or plastic for kneading in. I haven't included this as an essential item, because the plastic box I mentioned earlier will suffice, and takes up less space in the kitchen. But a nice large (and I'm talking 60cm across the top) bowl, with a flat base is certainly nice to use for mixing dough.
If you want to know more about making sourdough bread, check out my new website at:
www.sourdoughbaker.com.au
www.sourdoughbaker.com.au
Ok. That's about it for today. Once you've assembled this stuff, you'll be ready to make sourdough bread!
Saturday, February 14, 2009
Getting Down to It
If you've been following this blog, you'll know that sourdough starter is one part water to one part flour. But what's the method, exactly, to get it going?
A quick note before we begin - starter doesn't like metal at all. Always use plastic, glass or wooden utensils when dealing with it.
Day 1:
Take 25 g (a tablespoon) of wholemeal flour and mix it with enough luke warm filtered or spring water to make a thick paste. A small plastic countainer or glass jar will do for a container, just make sure the lid is not airtight, because you want it to breathe.
Leave it overnight in the room to begin the process.
Sourdough Starter Day 1: No Bubbles; smells like flour and water.
Day 2:

Now add twice the amount of flour (two tablespoons) and enough water to maintain a thick paste. Cover and put to one side for another day. By the end of this day you will see bubbles forming and it will take on the consistency of a sponge.
If it looks like it's going too fast, put the mixture in the fridge to slow it down.
Sourdough Starter Day 2: Bubbles starting to form. You can just detect a very faint smell of Bananas.
Day 3:
 Remove from the fridge, if you have refrigerated your mixture. You should get a slightly tangy sweet smell from the mixture. Feed with a quarter of a cup of flour and enough water to maintain a paste. Mix it in roughly with a plastic or wooden spoon. Don't worry about lumps - these will be eaten as the yeast begins to form.
Sourdough Starter Day 3: More Bubbles, and you can smell bananas now.
A word on Sourdough Yeasts
I should mention here that this particular sourdough starter is one that encourages wild yeasts which thrive in cool conditions. Different types of yeasts live at different temperatures. Winemaking yeasts, for example, like temperatures below 10 degrees centigrade. Generally, breadmaking yeasts like to multiply rapidly at above 25 degrees C, but are almost dormant below 15 degrees, so can be stored here for quite a few hours. We are going for yeasts which do well below 15 degrees C. These yeasts breed in cold conditions, and when they get warmed up, go absolutely crazy with reproductive zeal. Thus, they make great tasting bread which also rises well.
Day 4:
 By now you will start to see quite a few small bubbles in the still unripe sourdough starter. You should also be able to easily smell something - the smell will be quite like ripe bananas if the starter is beginning to ripen. The texture will be changing too - you'll see a progression from what looks like bubbles in batter to something resembling a sponge . Feed with a half a cup of flour and a half a cup of water the same way as yesterday. After an hour or two, put back in the fridge to control the temperature.
Sourdough Starter Day 4: Quite a few bubbles, and the smell of ripe bananas.
Day 5:
There will be more bubbles, and more banana smells. If things are going well, there will also be a quite tangy smell now. The texture will be spongy by now, which is good. This tangy smell indicates that a secondary level of fermentation is occurring. Feed with half a cup of flour and enough water to keep a paste consistency.
Sourdough Starter Day 5: A lttle spongy, and the banana smell will be getting tangy now.
 Day 6:
The smell will now be becoming quite tangy. If you have kept the temperature quite low throughout the process, the smell of bananas will still be there, but the tanginess will be steadily increasing. There will be bubbles on the surface of the mixture, and some throughout too.
If you can't detect bananas now at all, and the tang is quite vinegary, the fermentation is getting ahead of itself. Easily fixed. See day 7!
Sourdough Starter Day 6: Tangy and Spongy now.
Day 7:
You should be able to detect vinegar in the smell, and there will be quite a lot of bubbles in the mixture now. It's time to either use some in dough, or feed your sourdough starter for the fourth time.
Add a cup of filtered or spring water, and anoth er cup of wholemeal flour. Stir it in with a plastic or wooden spoon until combined. Allow the freshly fed starter to stand for an hour or two and/or return to the fridge in warmer weather. Now the cycle will begin again, only it will be accellerated somewhat. You have a component of fermented sourdough in your mixture, and this will feed on the batter you have given it. Because it is already alive, you will find that everything you observed the first time around will be magnified. Once the starter has returned to bubbling after this feed, it is ready to use again. This will take about a day.
Sourdough Starter Day 7 (before feeding): Tangy, spongy, and it's dropped down a bit.
It is important to note here that while the first cycle of feeding is complete, this sourdough starter will not make bread rise very well at all. If you do get bread to rise, it will tend to fall over or rise unevenly. There is not yet a stable acid / alkali balance in the mixture - but the good news is that progressive cycles of feeding you will now quickly get this acid balance right, and thus your starter will soon be making sensational bread!
Sourdough Starter Cycle:
There is a distinct pattern to be observed when fermenting sourdough starter. I have tracked it thousands of times, and I can tell you it goes like this:
 and 10:
You will observe the same process as the whole of the first week over these next three days. On about day 10 your fermented mixture will smell quite tangy, and the sponge will collapse a little. This is when your starter is ready to make bread, though the starter can be used whenever it becomes very bubbly. You might find that the dough doesn't rise as well as you might like. This will improve each time you feed and ripen the sourdough starter - the more you do it, the better the bread gets!
Close up of Sourdough Starter Day 10: it's risen and sponged again very quickly, and dropped back a little.
You can use your ripe sourdough starter any time after it has dropped back a little after the third feed. It will still be good to use for up to a week if it's kept in the fridge, even if all the bubbles have gone and it looks quite flat and lifeless. Often, at this stage, the water will separate and come to the top as a kind of greyish liquid. A small feed will revive it, and can be used in a few hours. If you are building up too much starter, pour some off. If left for too long, starter will become alcoholic, and will not make edible bread. A simple solution is to feed it again. Wait until there are a lot of bubbles in the mixture and then use for making bread. If you don't think you'll get time to make bread, simply freeze the starter after feeding. It will keep in the freezer indefinitely, and can be revived by simply thawing.
In future posts, I'll provide a number of other storage options which are designed for medium term storage where a freezer might not be available. I will also explain how you can keep starter 'cowboy style' for when you're camping or hiking. So stay tuned!
An Easier Way?
People always tell me that this process is complex and time consuming. While I find it quite fascinating and quick to do, I can fully understand where they are coming from. That's why I'm currently developing my own powdered instant sourdough starter, which comes from the ferment I've been nurturing for over 20 years now. But in the meantime, the method I've documented here will produce very consistent results at home for those who are prepared to get bitten by the sourdough bug. Once you've got your sourdough starter to this point, you will find that it is very easy to manage, with just a feed each time you want to make bread. There are ways to control things so that you can make bread as often or as little as you like. I'll be providing these tips over coming posts, which will save you going though all the pain that I went through when getting sourdough breadmaking at home comfortably into my routine.
I have a great Spelt Sourdough Starter recipe on my website at www.sourdoughbaker.com.au. Check it out!
Until then, happy fermenting!
A quick note before we begin - starter doesn't like metal at all. Always use plastic, glass or wooden utensils when dealing with it.
Day 1:
Take
 25 g (a tablespoon) of wholemeal flour and mix it with enough luke warm filtered or spring water to make a thick paste. A small plastic countainer or glass jar will do for a container, just make sure the lid is not airtight, because you want it to breathe.
Leave it overnight in the room to begin the process.
Sourdough Starter Day 1: No Bubbles; smells like flour and water.
Day 2:

Now add twice the amount of flour (two tablespoons) and enough water to maintain a thick paste. Cover and put to one side for another day. By the end of this day you will see bubbles forming and it will take on the consistency of a sponge.
If it looks like it's going too fast, put the mixture in the fridge to slow it down.
Sourdough Starter Day 2: Bubbles starting to form. You can just detect a very faint smell of Bananas.
Day 3:
 Remove from the fridge, if you have refrigerated your mixture. You should get a slightly tangy sweet smell from the mixture. Feed with a quarter of a cup of flour and enough water to maintain a paste. Mix it in roughly with a plastic or wooden spoon. Don't worry about lumps - these will be eaten as the yeast begins to form.
Sourdough Starter Day 3: More Bubbles, and you can smell bananas now.
A word on Sourdough Yeasts
I should mention here that this particular sourdough starter is one that encourages wild yeasts which thrive in cool conditions. Different types of yeasts live at different temperatures. Winemaking yeasts, for example, like temperatures below 10 degrees centigrade. Generally, breadmaking yeasts like to multiply rapidly at above 25 degrees C, but are almost dormant below 15 degrees, so can be stored here for quite a few hours. We are going for yeasts which do well below 15 degrees C. These yeasts breed in cold conditions, and when they get warmed up, go absolutely crazy with reproductive zeal. Thus, they make great tasting bread which also rises well.
Day 4:
 By now you will start to see quite a few small bubbles in the still unripe sourdough starter. You should also be able to easily smell something - the smell will be quite like ripe bananas if the starter is beginning to ripen. The texture will be changing too - you'll see a progression from what looks like bubbles in batter to something resembling a sponge . Feed with a half a cup of flour and a half a cup of water the same way as yesterday. After an hour or two, put back in the fridge to control the temperature.
Sourdough Starter Day 4: Quite a few bubbles, and the smell of ripe bananas.
Day 5:
There will be more bubbles, and more banana smells. If things are going well, there
 will also be a quite tangy smell now. The texture will be spongy by now, which is good. This tangy smell indicates that a secondary level of fermentation is occurring. Feed with half a cup of flour and enough water to keep a paste consistency.
Sourdough Starter Day 5: A lttle spongy, and the banana smell will be getting tangy now.
 Day 6:
The smell will now be becoming quite tangy. If you have kept the temperature quite low throughout the process, the smell of bananas will still be there, but the tanginess will be steadily increasing. There will be bubbles on the surface of the mixture, and some throughout too.
If you can't detect bananas now at all, and the tang is quite vinegary, the fermentation is getting ahead of itself. Easily fixed. See day 7!
Sourdough Starter Day 6: Tangy and Spongy now.
Day 7:
You should be able to detect vinegar in the smell, and there will be quite a lot of bubbles in the mixture now. It's time to either use some in dough, or feed your sourdough starter for the fourth time.
Add a cup of filtered or spring water, and anoth
 er cup of wholemeal flour. Stir it in with a plastic or wooden spoon until combined. Allow the freshly fed starter to stand for an hour or two and/or return to the fridge in warmer weather. Now the cycle will begin again, only it will be accellerated somewhat. You have a component of fermented sourdough in your mixture, and this will feed on the batter you have given it. Because it is already alive, you will find that everything you observed the first time around will be magnified. Once the starter has returned to bubbling after this feed, it is ready to use again. This will take about a day.
Sourdough Starter Day 7 (before feeding): Tangy, spongy, and it's dropped down a bit.
It is important to note here that while the first cycle of feeding is complete, this sourdough starter will not make bread rise very well at all. If you do get bread to rise, it will tend to fall over or rise unevenly. There is not yet a stable acid / alkali balance in the mixture - but the good news is that progressive cycles of feeding you will now quickly get this acid balance right, and thus your starter will soon be making sensational bread!
Sourdough Starter Cycle:
There is a distinct pattern to be observed when fermenting sourdough starter. I have tracked it thousands of times, and I can tell you it goes like this:
- Smells like fresh flour - no bubbles, just a thick batter.
- Smells faintly like bananas - maybe one or two bubbles in the mixture.
- Smells more like bananas, and quite sweet - can be quite a lot of bubbles in there now.
- Smells like tangy bananas - and the texture is starting to become spongy.
- Smells like vinegar and bananas - the texture is completely spongy.
- Smells more like vinegar than bananas - the sponge collapses a bit. Now it is ready to use, provided that your starter is established via one or more feeding cycles.
 and 10:
You will observe the same process as the whole of the first week over these next three days. On about day 10 your fermented mixture will smell quite tangy, and the sponge will collapse a little. This is when your starter is ready to make bread, though the starter can be used whenever it becomes very bubbly. You might find that the dough doesn't rise as well as you might like. This will improve each time you feed and ripen the sourdough starter - the more you do it, the better the bread gets!
Close up of Sourdough Starter Day 10: it's risen and sponged again very quickly, and dropped back a little.
You can use your ripe sourdough starter any time after it has dropped back a little after the third feed. It will still be good to use for up to a week if it's kept in the fridge, even if all the bubbles have gone and it looks quite flat and lifeless. Often, at this stage, the water will separate and come to the top as a kind of greyish liquid. A small feed will revive it, and can be used in a few hours. If you are building up too much starter, pour some off. If left for too long, starter will become alcoholic, and will not make edible bread. A simple solution is to feed it again. Wait until there are a lot of bubbles in the mixture and then use for making bread. If you don't think you'll get time to make bread, simply freeze the starter after feeding. It will keep in the freezer indefinitely, and can be revived by simply thawing.
In future posts, I'll provide a number of other storage options which are designed for medium term storage where a freezer might not be available. I will also explain how you can keep starter 'cowboy style' for when you're camping or hiking. So stay tuned!
An Easier Way?
People always tell me that this process is complex and time consuming. While I find it quite fascinating and quick to do, I can fully understand where they are coming from. That's why I'm currently developing my own powdered instant sourdough starter, which comes from the ferment I've been nurturing for over 20 years now. But in the meantime, the method I've documented here will produce very consistent results at home for those who are prepared to get bitten by the sourdough bug. Once you've got your sourdough starter to this point, you will find that it is very easy to manage, with just a feed each time you want to make bread. There are ways to control things so that you can make bread as often or as little as you like. I'll be providing these tips over coming posts, which will save you going though all the pain that I went through when getting sourdough breadmaking at home comfortably into my routine.
I have a great Spelt Sourdough Starter recipe on my website at www.sourdoughbaker.com.au. Check it out!
Until then, happy fermenting!
Monday, January 26, 2009
Starting the Sourdough Starter

The Place Where Sourdough Starts
Have you ever wondered how bread rises? To any home baker, including myself, the experience of watching the dough double in size is still one of the great things about breadmaking. It's also a sort of preliminary litmus test as to how successful your recipe or technique has been. But to get the dough to rise, we need to create carbon dioxide gas, and lock it up in some sort of bubble, which will expand as the carbon dioxide fills it, like a balloon filling with air. We do this by creating a process where fermentation occurs in the dough. Carbon dioxide is given off as a natural bi product of any fermentation process. Sourdough Starter is the thing which begins and feeds the fermentation process in dough, as it is rich in bacteria, enzymes such as amalyse and natural yeasts. This combination provides a perfect medium for the process called leavening.
Leavening for beginners - how bread rises
There are lots of ways to make bread rise, but they all rely on the same process of fermentation I just mentioned. For example, Baking soda and some sort of acid (cream of tartare, lemon juice, vinegar or whatever) will create the necessary chemical reaction to begin fermentation in dough. This method is used in the production of Irish Soda Bread, and some commercially produced Sourdoughs rely on it as well. More commonly, refined yeast, known as Sacccharomyces Cerviseae is used for leavening virtually all types of bread you'll find; indeed, this single celled funghi is the most widely used rising agent in the world - because it's easy and fast to manufacture, and can be controlled by adjusting simple variables like temperature, moisture or acidity. It also can be fed in such a way as to make bread rise strongly and quickly via the use of another ubiquitous commercial bread additive, Bread Improver.
Unfortunately, commercial yeast is designed to be very bland in flavour. It can also be quite infectious when left to reproduce in the stomach of a human being. The temperature inside us, combined with our intake of sugar and liquids, can prove to be ideal for the growth of candida albicans; a common form of yeast infection leading to many allergic reactions and gradual immune system depletion. So it's not all that good for you. When you couple the use of refined yeast with yeast foods such as Bread Improver, the potential for long term ill health is multiplied many times.
An altogether healthier and tastier option, sourdough starter can be made quite easily to replace commercial yeast or baking powder to make the dough rise when you want tomake home made bread. I've already talked about my own starter in this blog, and now I want to provide the basic information you'll need to establish one yourself, easily and within 2 weeks.
I'll also mention before I begin that if this all seems like too much committment for a loaf of bread, you can buy dried starter fairly easily nowadays, and I'll soon be supplying my own 20 year old version for home bakers everywhere online. But more on that later...
The Fundamentals of Starter
Sourdough Starter not one kind of yeast, as with commercial yeast, but quite a few different kinds which vary according to the conditions they find themselves in. It is also a culture of 'friendly' bacteria, which helps to create the ideal conditions for the yeasts to multiply. But more importantly, a healthy Sourdough Starter has a stable microbiology; it's a living thing which, with the right conditions, can be trained to produce consistent and great tasting bread every time. Not only that, but most experts agree that sourdough bread is easier to digest and provides better nutrition than ordinary yeasted breads. So lets get started!
Once you understand the fundamentals of Sourdough Starter, you can keep it living and thriving and working to produce great bread for you as often as you wish.
Initially, you are looking to gather airborne and flourbourne yeasts, to culture and grow them, and then to use and feed them in a regular rhythm for home breadmaking. The process of building a starter takes from one to two weeks (at the longest), and once established, the starter can be fed and used on a daily basis if desired.
Basic Starter Recipe
Starter has the simplest of ingredients:
- one part flour to one part water!
Types of Flour
Another point which has been made in other texts on the subject is that starter should only be fed on the type of flour you wish to use predominantly. While I agree this does produce the most consistent results, I have enriched my starters with things like brown and white rice, cooked barley, potatoes, millet and oats, raisins and sultanas, and the water these have mascerated in. I have used all types of flours, including spelt, rye, white and wholemeal wheat flour, and other flours besides. If you like to experiment like I do, then don't hold back! The worst that can happen is you'll have to pour off most of it and start again. Different flours have different properties, and you will arrive at a favourite which suits you over time.
A home for your starter
If you have a plastic container with a loose fitting lid, about 2 litres capacity, then you have the perfect vessel for starter to live in. If you only have, say, a honey container with a tight sealing lid, then puncture the lid with a knife so a little air can pass through.
Ultimately, this will become your starter's abode. It lives in your refridgerator between uses, and will be left out before use to thaw slightly, so as activity is happening. If you are in a warm climate in mid summer, you will need to only bring the starter out of the fridge for an hour or less when you are making bread. If you live in a cold climate, the starter may live out of the fridge all the time. This of course something which you will adapt according to your experience - but I have found that the fridge is the best default storage area, as they run at a consistent temperature and are reasonably immune from airborne contaminants.
Some tips before you try the recipe
- In the early stages of fermenting a starter, you'll get some wastage, as you need to pour off some of the batter as you go, in order to feed it with fresh food. This batter you pour off can be used in your regular yeasted dough, or in pancakes or gravies, if you prefer to waste nothing at all.
- The warmer the starter gets, the more activity there is, and so the more often you'll need to pour off some and feed it.
- Equally, the lower the temperature, the slower the fermentation process. If the temperature is too low, fermentation will be overtaken by mould and the starter will become suffocated. However, even at temperatures below 5 degrees celsius but above freezing, fermentation can still be occuring. The mould which grows on the surface will very often dry out, and can be peeled off and discarded to no ill effect. The remaining batter can be fed and re established quite quickly, and become active and useful again virtually overnight.
- Starter, despite much talk to the contrary, is actually close to immortal. Once established, it is really hard to kill off. Even a dormant starter can be revived rapidly with a good feed and a bit of warmth.
- In the early stages, however, a starter is very fragile - but over time they grow stronger, as local yeasts and bacteria take hold. The most important thing in the early days is not to 'drown' the starter with too much food. Similarly, a watched pot never boils. It's better to leave it alone to do its thing than to fuss over it all the time. If things take a bit longer than I've stated, relax! The best action is inaction. Wait another day. Lash out if you like - wait two!
- Starter will be sweeter when fed more frequently, but will take longer to leaven your dough. Conversely, it will be more sour when fed less often, but will get the dough going fairly quickly.
If you want more detail on starters, and recipes for different kinds, go to my website at:
www.sourdoughbaker.com.au.
Happy Baking!
Tuesday, January 20, 2009
The Place to Start Sourdough is the Starter!

The Mother of all Bread
The thing about Sourdough which makes it unique is the Starter it is made from. Some call this the Mother, the Ferment, the Leaven, and many other terms. There is even a yeast identified called the 'SanFransiscan Lactobacillus' or something...I'd actually love to give my own Starter a name, because it's been around for over 20 years so far, and I know it not as a thing but as a person. I could call it 'Aussie', because it's got a bit of our national character about it. Certainly, it eats, sleeps, multiplies and produces stuff, just like we all do. I've referred to Starter in past articles as a pet which lives in your fridge, and for good reason - if you don't look after it, it will turn on you. Beware. But if it's well fed and housed, it will be an eternal thing which could live longer than you do. Oh, and it also helps you to make great tasting sourdough breads!
I love all these different terms used to describe a Sourdough Leaven. Being an Aussie, I'll just refer to it as 'Starter' from now on, because that's what it does - it 'Starts' the dough on the process of rising, which is essential to making any bread edible.
The Story of My Sourdough Starter
My Starter has been infused with some of the greats over the past 20 years, including an Egyptian yeast that's over 2000 years old, a 'Cowboy' yeast (which is what the 'San Fransiscan' I mentioned earlier would have come from), as well as one of the original Australian Sourdough Bakers own ferments, by a guy called John Downes. But in the main, I raised it myself from scratch and fed it regularly. It's lived in many locations with many different bloodlines - I've incorporated the above starters into my own as a kind of 'cultural exchange', and in the process I've discovered it's tough, this baby - you just can't kill it. It seems the older they get, the stronger they become. Even if I haven't fed mine for weeks, it'll come back to life within hours by just feeding it some flour and water.
Of course, I worked this starter commercially for about fifteen years - for many years I had it running to over 100 kg a day in terms of volume. It's had every grain known to man in there to feed it, especially wheat, rye, spelt, rice, millet, corn, oats and barley, as well as some fruits too - mainly raisins and sultanas. Nowadays I use it at home when I need to make bread, but versions of it can be found in many bakeries and homes around the world, in cities such as Berlin, Tokyo, New York, Ohio, Sydney, Colorado, Gosford, LA, Melbourne, Dublin, and even Lawson (which really doesn't qualify as a city, but it's here nonetheless).
Feeding and Keeping a Starter - Overview

A Starter can be fed on anything that will ferment - essentially carbohydrate. I've found that a varied diet will change the qualities, textures and flavours the Starter produces in the breads you make. If consistentcy is desired, feed it the same thing all the time. It will cope. However, a varied diet breeds different microbiologies, and I believe variation breeds resilience too. That's why mine has continued to thrive - it has had various conditions throughout its life, and thus has become strong despite changes, rather than because of sameness. The same could be said for people - the most successful have had a variety of inputs and locations, and thus they thrive and are strong.
A lot of people struggle to establish a starter. Many others simply can't keep them going for very long. It has to be said that in the early stages, starter requires committment, time and patience. For those without an abundance of these things, I will soon be manufacturing a dried version of my own starter,which for many people will be a better and easier option from a practical point of view. But for those who want to give it a go, read on as I go into detail.
If you would like to read more about Sourdough Starter, as well as recipes and other Tips and Tricks, have a look at my website at:
www.sourdoughbaker.com.au.
Happy Baking!
Sunday, January 18, 2009
You Can Do This!

In this blog, I'm going to show you how to make sensational sourdough bread at home, without the use of machines or chemicals. You can make these breads very cheaply, and they are clean, quick and easy to do. They will prove their worth every time, because they simply taste better than anything you might have tried elsewhere. Not only that, but the more you do this method, the better the bread gets. I'm serious!
Many years ago I discovered that bread didn't have to be bland and boring. I already knew that it didn't have to be white and square either - it's just that at that time Australians, (and from what I can tell this also applies to Americans and the Englishtoo) tended towards doughy white squares as a staple wrapping for all else that constituted food.
Thankfully, all that has changed now, and interesting breads are available in all shapes and forms from just about anywhere. The way we use bread has also changed, with a more international approach helping to keep it interesting.
However, while there are a plethora of bread styles to choose from, it's hard to get away from the fact that most commercially made breads are compromises. What I mean by this is that despite our efficient transport systems, our clever marketing and manufacturing methods, our 'global villages' and our ability to faithfully copy the classic bread styles, most breads come out of a factory days if not weeks before we consume them. Then they are packaged, travel hundreds if not thousands of kilometers to get to us, are shuffled around on supermarket shelves until they are sold (or disposed of to become, in most cases, landfill, or at best compost). Despite all this internationalisation, it's still hard (and costly) to have fresh, inexpensive and tasty bread which is produced to order, fresh and vibrant and delicious.
I spent fifteen years devising and perfecting all kinds of amazing breads. I admit freely that it was my passion, and it took over every waking (and often sleeping) minute of my time. My bakery over these years produced many millions of exquisite breads, which found their way into people's homes and hearts over that time. I perfected many sourdough and other recipes, which remain in use commercially to this day - my methods are used both in Australia and internationally for the simple reason that they are simple, natural, and they work well every time.
Stay tuned and you will be richly rewarded. If you would like to know more about some of these methods in detail, go to my website, www.sourdoughbaker.com.au.
Subscribe to:
Posts (Atom)